5. Performing Proactive Restores
Backup data sets are only as
good as the restores and recoveries they support. This is why it is
essential for you to test the restoration procedure and to test as many
scenarios as possible to ensure that when you do face a disaster, you
can recover the data or systems you lost by relying on your backups.
When working with a DC, there are several restoration scenarios:
Restoring
nonauthoritative data to the directory to reduce the replication
required to update a DC that has been off for some time
Restoring authoritative data because the data in the directory has been destroyed
Restoring a complete DC from a backup
When you need to restore
data to a system, you cannot do so when the DC is running, despite the
fact that in Windows Server 2008 R2 you can control the AD DS service as
you would other services. In fact, you must restart the server and run
WinRE, or you must restart the server in Directory Services Restore Mode (DSRM). Each method supports different restoration procedures. DSRM supports data restores to the directory; WinRE supports recovery of the entire system.
5.1. Restarting in DSRM
There are two ways to launch a
server into DSRM. The first relies on a server reboot and, during the
reboot process, pressing F8 to view startup options. Note that if you
are running the DC in a virtual machine on Hyper-V, you must press the
F5 key while the machine is starting to access the Windows
Boot Manager screen first, then press F8 to access Advanced Boot
Options. This allows you to choose the Directory Services Restore Mode. Remember that you need to have access to the DSRM password to use this mode.
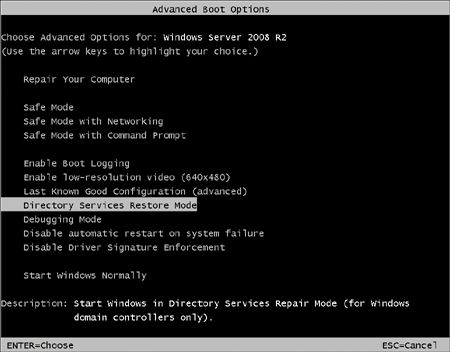
You can also force the reboot
directly into DSRM by changing the boot order in the boot file of the
OS. This is done with the Bcdedit.exe command. To use the command line
to change the boot order, type the following command in an elevated
command prompt:
bcdedit /set safeboot dsrepair
Then, when you need to restart the server normally, use the following command:
bcdedit /deletevalue safeboot
If you need to perform the operation only once, it might be best simply to rely on the F8 key at system startup.
Warning:
IMPORTANT RESETTING THE DSRM PASSWORD
To reset the DSRM
password—an activity you should perform on a regular basis—you must
first boot into DSRM and then use the standard password changing
methods.
Note:
MORE INFO RUNNING DCS AS VMS
For more information on working with DCs as VMs, go to http://technet.microsoft.com/pt-pt/library/dd363545%28WS.10%29.aspx.
5.2. Identifying the Appropriate Backup Data Set
One of the challenges faced by organizations who used AD DS in previous versions of Windows was the ability to identify properly whether the data they required was located in a particular backup data set. In Windows Server 2008 R2, you can rely on the AD DS database mounting
tool to view the contents of a data set before you perform a recovery
operation. This prevents the previous hit-or-miss approach that system
administrators needed to rely on.
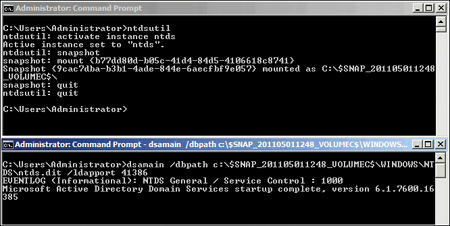
The mounting tool works with database snapshots. Snapshots can easily be created with the Ntdsutil.exe tool. For example, to generate regular snapshots of a directory, you would use the following command:
ntdsutil "activate instance NTDS" snapshot create quit quit
This generates a snapshot
on the same volume as the database. Be careful how you use this command,
because it will quickly fill up the disk on which the Ntds.dit database
file is located.
Perform the following steps to view backup data set or snapshot contents:
Launch an elevated command prompt by right-clicking Command Prompt in the Start menu and choosing Run As Administrator.
Begin
by listing the available snapshots. Snapshots are created each time a
backup is run or through the Ntdsutil.exe create subcommand, but you
need to have the snapshot GUID to mount it. Use the following command to
pipe all snapshot GUIDs into a text file.
ntdsutil "activate instance NTDS" snapshot "list all" quit quit >snapshot.txt
Now, look into the text file to locate and copy the GUID you need:
notepad snapshot.txt
Locate
the GUID you need and copy it to the clipboard. The snapshot GUID is
always preceded by the date and time you created the snapshot. Remember
to include the brackets in the selection. Minimize Notepad in case you
need a different GUID.
Mount the snapshot you need to use. Remember to right-click and then click Paste to paste the GUID at the mount command.
ntdsutil
activate instance NTDS
snapshot
mount guid
quit
quit
Note the path listed for the mounted database.
Use the AD DS database mounting tool to load the snapshot as an LDAP server.
dsamain -dbpath c:\$SNAP_datetime_VOLUMEC$\windows\ntds\ntds.dit
   -ldapport portnumber
Be sure to use ALL CAPS for the -dbpath value and use any number beyond 40,000 for the -ldapport
value to ensure that you do not conflict with AD DS. Also note that you
can use the minus (–) sign or the slash (/) for the options in the
command. The database is mounted and will stay mounted until you have
completed your operations. Do not close the command prompt. In fact, you might want to use two command prompts, one for mounting the snapshot in Ntdsutil.exe and one for the Dsamain.exe command. Then you can mount and unmount different snapshots until you locate the one that contains the information you need to recover.
Note
that if the dsamain command gives you errors, you must restart the
server to clear reserved TCP ports. After the server is restarted, the
operation should work properly.
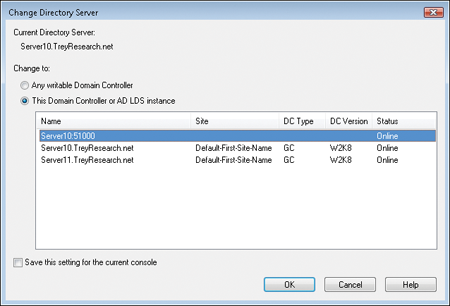
Now
use Ldp.exe or Active Directory Users And Computers to access the
instance. For example, launch Active Directory Users And Computers from
the Administrative Tools program group.
Right-click Active Directory Users And Computers and click Change Domain Controller.
In the Change Directory Server dialog box, click <Type A Directory Server Name[:Port] Here>, type the servername:portnumber, such as Server10:40000,
and press Enter. (Use the port number you specified in step 6.) The
status column should indicate that the server is online. Click OK.
Search
the loaded instance to locate the information you need and view its
properties. If it is the instance you need, make note of its name. Close
Active Directory Users And Computers.
Return to the dsamain command prompt and press Ctrl+C to stop Dsamain.exe.
Unmount the database snapshot. Use the following command. Remember to paste in the GUID from the clipboard.
ntdsutil
activate instance NTDS
snapshot
unmount guid
quit
quit
Close the command prompt.
If the selected database snapshot was not the one you were looking for, repeat the procedure. If it was, proceed to a restore.
Warning:
IMPORTANT USING ARROW KEYS IN COMMAND PROMPTS
You can use the up and down
arrow keys when you are in a command prompt to return to previous
commands. Also, note that there are different buffers in the command
prompt. For example, there is a buffer in the command prompt itself and a
different buffer in the Ntdsutil.exe command. You can use both to
return to previous commands and save typing.
5.3. Performing Nonauthoritative or Authoritative Restores
As mentioned earlier, performing a restore requires that you restart the directory in DSRM. This means shutting down the DC. Remember that you can perform either nonauthoritative
or authoritative restores on both the full installation and Server
Core. A nonauthoritative restore addresses a DC rebuild when no data was
lost because it is still found on other DCs. An authoritative restore
restores data that was lost and updates the Update Sequence Number (USN)
for the data to make it authoritative and ensure that it is replicated
to all other servers. You can use the same procedure for both types of
restores, but you can also perform authoritative restores without using
DSRM. Make sure you have connected the removable media on which you
stored the backup that you want to restore.
Repair
the server, if required, and start it. During startup, press F8 to view
the startup modes. Remember that if you are using a virtual machine,
you must press F5 before you can press F8.
Select Directory Services Restore Mode and press Enter.
This will boot into Windows. Press Ctrl+Alt+Delete, and then log on with the DSRM account using the servername\accountname
format and password. You will need to switch users to log on because
the last logged on user account will be displayed by default. Use the
DSRM password you set when you created the DC.
You
can restore the data either through the command line or with Windows
Server Backup. Note, however, that when you want to restore directory
data, you must perform a System State restore and, to do so, you must
use the command line.
Launch an elevated command prompt by right-clicking Command Prompt on the Start menu and choosing Run As Administrator.
Type the following command:
wbadmin get versions -backuptarget:drive -machine:servername
For example, to list the available backups located on D drive on SERVER10, type:
wbadmin get versions -backuptarget:d: -machine:server10
Note the version identifier information, because you need the exact name for the next command.
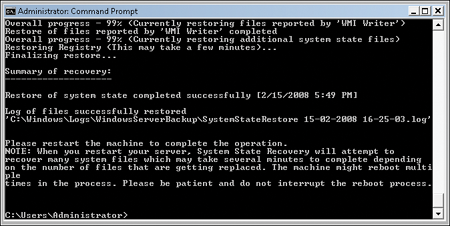
To recover system state information, type the following command:
wbadmin start systemstaterecovery -version:datetime -backuptarget:drive
   -machine:servername -quiet
For example, to recover the system state from a backup dated February 15, 2008, from D drive on SERVER10, type:
wbadmin start systemstaterecovery -version:02/15/2008-19:38
   -backuptarget:d: -machine:server10 -quiet
You use the -quiet option to avoid having to confirm the backup operation. Note that the restore takes time to complete.
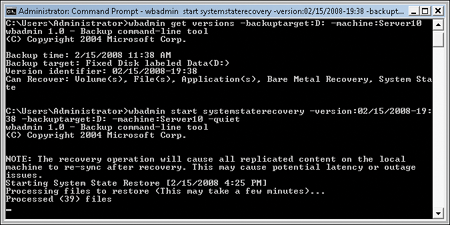
When prompted, press Y to restart the DC in its normal operating mode. When you restart the server, AD DS knows that it has recovered from a restore and performs an integrity check of the database as it starts.
If you are performing a nonauthoritative restore, you are finished. AD DS replication will bring this server up to date when the restart is complete.
Note:
IMPORTANT USING DFS REPLICATION
If your forest is in Windows
Server 2008 R2 functional level, you will be using DFS replication. In
this case, the restore creates a nonauthoritative version of the SYSVOL share. If you want to avoid additional replication, add the authsysvol switch to the Wbadmin.exe command.
If you are performing an authoritative
restore, you must mark the restored data as authoritative. The best
approach is to perform this restore with an online DC. Use the following
steps:
With
the server restarted in normal mode, log on with domain administrator
credentials. Launch Server Manager, expand the Configuration node, and
click Services. Locate the Active Directory Domain Services service,
select it, and then click Stop in the details pane. Click Yes when
prompted to stop dependent services.
Launch Command Prompt as an administrator and type the following commands:
ntdsutil
activate instance NTDS
authoritative restore
restore object database
quit
quit
The restore object database subcommand marks all the data in the Ntds.dit database of this DC as authoritative. When you use this command, you are prompted to confirm the restore. Click Yes to do so.
If you want to restore only a portion of the directory, use the restore subtree subcommand in Ntdsutil.exe, as follows:
restore subtree ou=ouname,dc=dcname,dc=dcname
where you must supply the distinguished name of the OU or object that you want to restore.
Close the command prompt and restart the AD DS service.
After the service is
restarted, the replication process starts and the restored information
that has been marked as authoritative is replicated to all other DCs. AD
DS replication brings the server up to date when the service is
restarted by replicating data from this DC to others because the restore
was authoritative.
Tip:
TIP
Performing an authoritative or nonauthoritative
Active Directory restore, working with the restartable AD DS service,
and working in Directory Services Recovery Mode are important parts of
this topic on the exam.
5.4. Restoring from a Complete Backup
When the DC is completely down and needs to be rebuilt, but you have access to a full
server backup, you can perform a complete system restore. You need
access to the full server backup files. If they are on a removable
drive, make sure this drive is connected to the server before you begin
the restore; otherwise, you must restart the server. If the files are on
a network drive, make note of the path. Also, obtain the Windows
Installation Media DVD or, if your new DC is a virtual machine, link its
DVD drive to an ISO file containing the Windows Installation Media.
Full server recoveries can be performed through the graphical interface or the command line.
5.4.1. Performing a Graphical Full Server Recovery
Performing a Graphical Full Server Recovery
To perform a full server
recovery with the graphical interface, use the following procedure. This
procedure applies to both the full installation and Server Core.
Insert
or connect the Windows Server 2008 R2 installation DVD, restart the
computer, and, when prompted, press a key to start from the DVD.
On
the initial Windows screen, accept or select the language to install,
the time and currency format, and a keyboard layout, and then click
Next.
In the Install Now window, click the Repair Your Computer link.
In
the System Recovery Options dialog box, click anywhere to clear any
operating systems that are selected for repair and click Next.
Under Choose A Recovery Tool, click System Image Recovery.
If the backup is stored on a remote server, click Cancel on the warning message.
Choose Select A System Image and click Next.
In
the Select The Location Of The Backup page, perform the following
steps, depending on whether the backup is stored locally or on a network
share:
If the backup is stored on the local computer, select the location of the backup and click Next. Proceed to step 9.
If
the backup is stored on a network share, click Advanced, and then click
Search For A System Image On The Network. Click Yes to confirm.
In the Network Folder, type the path for the network share and click OK.
Type the appropriate credentials and click OK.
In the Select The Location Of The Backup page, select the backup image and click Next.
Select the date and time of the image to restore and click Next.
If
you want to replace all data on all volumes, on the Choose Additional
Restore Options page, select Format And Repartition Disks.
To
prevent volumes that are not included in the restore from being deleted
and re-created, click Exclude Disks, select each disk you want to
exclude, and then click OK.
Click
Next, and then click Finish. Click Yes to confirm that all selected
disks will be reformatted and replaced with the data in the image
backup.
When the restore is complete, the server should restart as a new image of the server you restored in the backup set you used.
To perform a full server
recovery with the command line, use the following procedure. This
procedure applies to both the full installation and Server Core.
Insert
or connect the Windows Server 2008 R2 installation DVD, restart the DC,
and, when prompted, press a key to start from the DVD.
On
the initial Windows screen, accept or select the language to install,
the time and currency format, and a keyboard layout, and then click
Next.
In the Install Now window, click the Repair Your Computer link.
In
the System Recovery Options dialog box, click anywhere to clear any
operating systems that are selected for repair and click Next.
Under Choose A Recovery Tool, select Command Prompt.
At the command prompt, type diskpart and press Enter.
At the diskpart prompt, type list vol and press Enter.
Identify from the list the drive letter for the volume that corresponds to the location of the full server backup you want to restore. The drive letters in WinRE do not necessarily match the volumes as they appeared in Windows Server 2008 R2.
Type exit and press Enter.
At the Sources prompt, type the following command and press Enter:
wbadmin get versions -backuptarget:drive -machine:servername
For example, to list the available backups located on the D drive on SERVER10, type:
wbadmin get versions -backuptarget:D: -machine:SERVER10
Note the version identifier information, because you need the exact name for the next command.
At the command prompt, type the following command and press Enter:
wbadmin start sysrecovery -version:datetime -backuptarget:drive
   -machine:servername -quiet
For example, to recover the system state from a backup dated February 15, 2009, from D drive on SERVER10, type:
wbadmin start sysrecovery -version:02/15/2009-19:38 -backuptarget:d:
   -machine:server10 -quiet
You use the -quiet option to avoid having to confirm the backup operation.
After
the recovery operation has completed, minimize the command window and,
in the System Recovery Options dialog box, click Restart.
The server should restart and operate normally.